How To Frame a Door
Rough Opening
Check Out The Building Directions Below!

1. How to frame a Door Rough Opening:
The very first thing you must do is purchase the desired, pre-hung
door to learn what the dimensions of the prescribed rough opening.
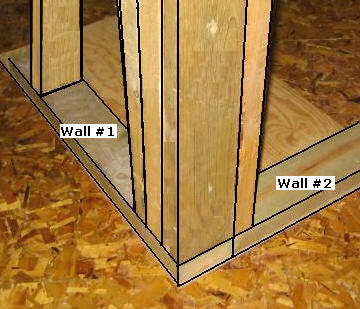
Determine the location and dimensions
of the new wall and the position of the door. You have built
the first wall, Wall #1, per the instructions for "How
to Build a Wall." The three 2x4's end the Wall #1 where
the corner will meet Wall #2 with the Door opening.
2. To build the second wall, measure from
the base plate of Wall #1 to where Wall #2 will end. With this
measurement, cut the two top plates, and the bottom plate to size.
Install the Top Plate #1 of Wall #2 and mark the placement line for
the Base Plate of Wall #2 per the instructions found in: "How
to Build a Wall."
3. Select Top Plate #2 of Wall #2 and the
Base plate and layout and mark the placement of the studs every 16",
per the wall building instructions. Given the rough opening
dimensions provided by the door manufacturer, decide the placement
of the door opening; mark the rough opening space on the Base Plate
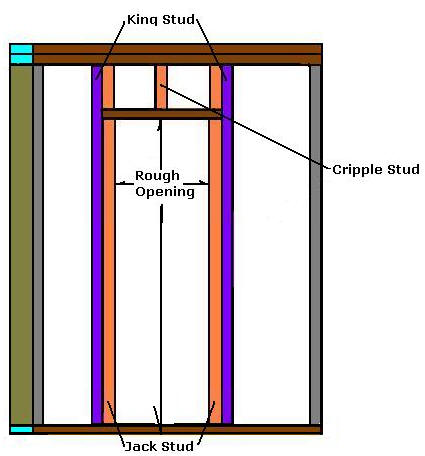
and Top Plate #2. As shown above, measure and mark out from
each edge of the rough opening, 1 1/2" for the "Jack Stud" placement
and 1 1/2" for the "King Stud" placement.
4. Cut the studs and nail them in place per
the wall building instructions including the "King Studs" (do
not nail the "Jack Studs at this time).
5. Select the two Jack Studs, measure, mark,
cut the Jack Studs to the dimensions of the vertical rough opening;
subtract 1 1/2" to allow for the thickness of the Base Plate; nail
the Jack Studs in place.
6. Select a 2 x 4, measure the distance
between the King Studs; Measure, cut, and nail the top, cross-plate,
as shown above.
7. Select another piece of 2x4, measure the
distance above the door opening; measure, cut, and nail the three Cripple
Studs as shown above. Place the Cripple Studs in place to
maintain the consistent 16" stud placement.
8. Lift Wall #2 into place; ensure the
boards making the corner are tight and lined up with the existing
wall #1. If Wall #1 is plumb, the Wall #2 should also be plumb
from top to bottom; the corner should be straight and plumb.
Nail the Top Plate into place and then secure the base and the
corners at each end of Wall #2.
9. With the wall in place, drill the
necessary holes for wire or pipes; add the wire and pipes; be sure
to nail any necessary metal pipe guard plates onto the studs.
10. Add the stud covering material of choice
and have a fun day. Access the following tips:
How to Frame a Wall
How to Frame
a Corner
How to Frame a
Window Rough Opening
How To Hang and Finish Drywall
|