Introduction: The
measurements for the Sawhorse in this plan are:
34" Wide x 26" High x 26" Deep
Of course, you can adjust these measurements to suit your
requirements.

Materials for the Saw Horse:
2 x 4: 145" (two, 8' Long, 2 x 4 or scrap)
Two pieces of 1/2" scrap plywood: 12" x 12"
1 x 4 (for added strength, substitute 2 x 4) scrap pine:
96 "
New wood screws: 40 @ 1 1/2" and four @ 3"
Step One, Cut End Panels
Using the 1/2" plywood stock, cut two squares 12" x 12";
these will be the end Support Panels.
Step Two, Cut Stock
Cut 2 x 4, four Legs @ 28" each.
Cut 2 x 4, Top Rail @ 33"
Cut 1 x 4, Front/Back Support Rail, two @ 33"
Cut 1 x 4, End Support Rail, two @ 15"
Step Three, Screw Support Squares to Top Rail
Place 33" long 2 x 4 Top Rail on a flat service and
place a center mark at each end.
Take the 12" squares; on one edge of each square
mark the 6" center point along the one edge. With a
speed square, transfer the center mark from the edge; draw a
line about two inches long from the edge toward the center of
the square.
Take one 12" square and line up the center mark with the
center mark on the 2 x 4 Top Rail on the right and drive two,
1 1/2" screws through the plywood into the end of the 2 x 4
Top Rail.
Repeat this same process for the left side.
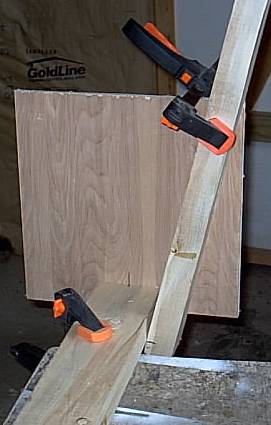
Step Four, Attach Legs
Take all four 28" Legs; at one end of each leg, using a
speed square, mark a pencil line across the 2 x 4, 1" from the
end (this will allow for the legs to have a one-inch overhang
beyond the Top Rail as shown above).
Extend the right side of the Top Rail with Support Square
in place over the edge of your work service by about five
inches and clamp the Top Rail to your work service.
Take two Legs for the right side; one for each edge of the
Top Rail. Using the one inch pencil line on the leg as a
guide, place the pencil line on the top edge of the Top Rail
with the Leg touching the 12" End Support Square; keeping the
line in place, move the lower part of the leg out at an angle
until the leg meets the lower corner of the 12" End Support
Square and clamp the Leg to the End Support Square as shown
above.
Drive three, 1 1/2" screws through the Support Square into
the Leg.
Drive one, 3' screw through the Leg into the Top Rail.
Repeat this same process for the other Right Leg.
Repeat this entire process for the Left Legs.
Step Five, Attach the Support Rails
Take the 1 x 4 Support Rails.
Attach the 15" End Support Rails first; the Left and the
Right.
Attach the 33" Front and Back Support Rails.
Step Six, Cut the Protruding Ends
Using a saw, cut off all protruding edges, including the
edges of the Support Squares.
Option: For added support,
attach a 34" Long 2 x 6 to the top of the Top Rail.
|